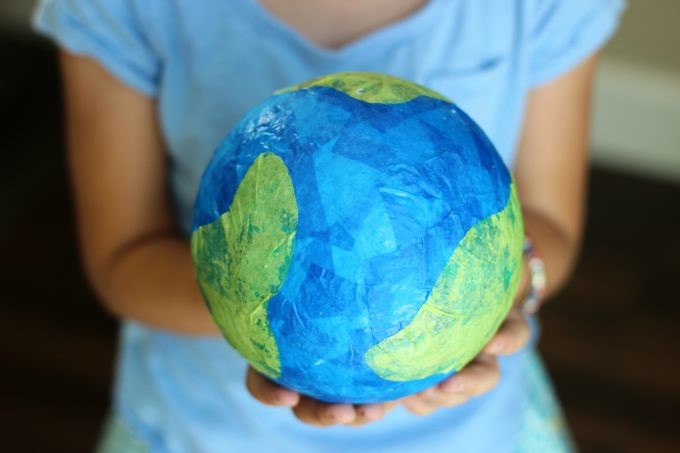
DIY Tissue Paper Globe
This week, our crafty friend Brandy shared her easy 4-step guide to making your own DIY tissue paper globe. This is a fun craft for little globetrotters, who can mark the places they’ve visited with Little Passports! Read on to learn more.
Create Your Own Colorful Globe
Tissue paper, a Styrofoam ball, and a bit of glue is all you need to make a darling little globe. This craft can also be adapted to make a solar system! Hang your globe with a small hook and string from the ceiling for a fun way to display.

I love using tissue paper for crafts because it is easy to work with and so colorful! We’ve made a vase and a sun catcher in the past, and today we are sharing how we made this darling tissue paper globe. Our kids have maps on their walls and are interested in learning about the places here on earth, and in the solar system, so we made this little globe to hang in their room. It was so easy to make and you can even mark the places you’ve traveled!
Supplies
- Styrofoam ball
- Green and blue tissue paper
- Scissors
- White glue or Mod Podge
- String
- Screw eye
- Brush, optional
Instructions

1. Cut 2 pieces of blue tissue paper into strips, then into 1-2″ squares. Cut abstract shapes out of green tissue paper for your continents, or you can be detailed and cut out the exact shapes using a map for reference.

2. We found that using our fingers to apply the glue worked best, but a brush works well and is less messy. Apply glue to your ball. Place tissue paper squares on your ball, overlapping and covering all of the white. Use glue to secure seams and make everything is nice and smooth.

3. After applying the blue squares, lay the green continents on top and smooth with your fingers. Brush a thin layer of glue over entire ball and let dry (the white glue will dry clear). A skewer and jar work great to keep it from sticking to your work surface while drying.

4. Dip your hanger in a bit of glue and screw it into the Styrofoam. Let dry.

5. Hang from the ceiling or wherever you like. Don’t forget to mark the places you’ve visited!
If your child enjoyed making this project, they’ll love our Craft Discovery subscription box! Every month they’ll celebrate the season with a new craft, build a sense of accomplishment as they display and share their creations, and explore learning activities that cultivate curiosity about art, science, geography, and culture. Let’s get crafting!