Welcome Spring with This DIY Kite!
After months of chilly winter, it’s no surprise that people everywhere get excited to see the first signs of spring. But these signs vary from country to country. In Japan, the blooming cherry trees signify the changing seasons, while the scent of soon-to-harvest garlic symbolically marks the Persian New Year and the onset of spring.
Some nations even celebrate spring with colorful festivals––from religious holidays such as Holi (India’s Festival of Colors) to the Flower Parade of the Bollenstreek in Holland to kite-flying extravaganzas in the U.S., Australia, and many other countries.
That’s likely because when the sun starts to warm the earth in the spring months, the hot air rises, creating windy conditions ideal for kites. This year, encourage your kids to learn how to make a kite and participate in this classic spring activity!
The Age-Old Tradition of Kite Flying
Kites are the oldest known heavier-than-air flying machines. Kite flying is a global hobby, and oral histories from Malaysia, Indonesia, New Zealand, and Hawai’i suggest that people in each place invented the kite. However, many historians believe that the first kite was flown in China.
According to written records, a Chinese philosopher named Mo-tse (470–391 BCE) created a bird-shaped kite over a three-year span. The “bird” was made of wood, and Mo-tse “flew” it on its tethered line only once, so there’s some debate over whether Mo-tse really invented the kite. However, by 200 BCE, someone in China had come up with kites, because the Chinese General Han Hsin was using them in his military efforts. At least once, he flew a kite over a city wall to measure how far his army would have to tunnel under it. Around the same time, China began celebrating a holiday called “The Festival of Ascending on High” (or the “Double Ninth Festival,” since it took place on the ninth day of the ninth month in the lunar calendar), on which people would fly kites.
As kite-flying developed in China over the centuries, people there experimented with different materials for building them. Mo-tse and his contemporaries used wood to build kites (called mu yuan), while kite makers in the Han Dynasty learned how to make a kite out of paper to build their zhiyuan (which translates to “paper eagles”). By the Tang Dynasty (618-907 CE), kites were made of silk and bamboo sticks.
Modern kites (in China and elsewhere) are made from synthetic materials such as nylon, plastic, and fiber, but kids can still make their own kites from paper and a few other materials around the house.
How to Make a Kite: Follow These Easy Steps
People all over the world fly all types of kites—you might have even passed a few yourself. But when it comes to learning how to make a homemade kite, the simple diamond is the best for kids and new kite enthusiasts.
DIY Diamond-Shaped Kite for Kids
Materials
- Lightweight sheet of colored paper (or a newspaper sheet)
- 1 quarter round wooden dowel or stick (24 inches or 60 cm)
- 1 quarter round wooden dowel or stick (20 inches or 50 cm)
- Child-safe scissors
- Pencil
- String or flying line
- Masking or packing tape
- Ruler
- Glue
- Yarn or ribbons
Note: Making and flying a kite requires completing several intricate tasks. We recommend an adult work closely with the kids to do this activity. You are the best judge of your kids’ abilities.
Safety Warning: Kites are not to be used near power lines or during thunderstorms.
Directions
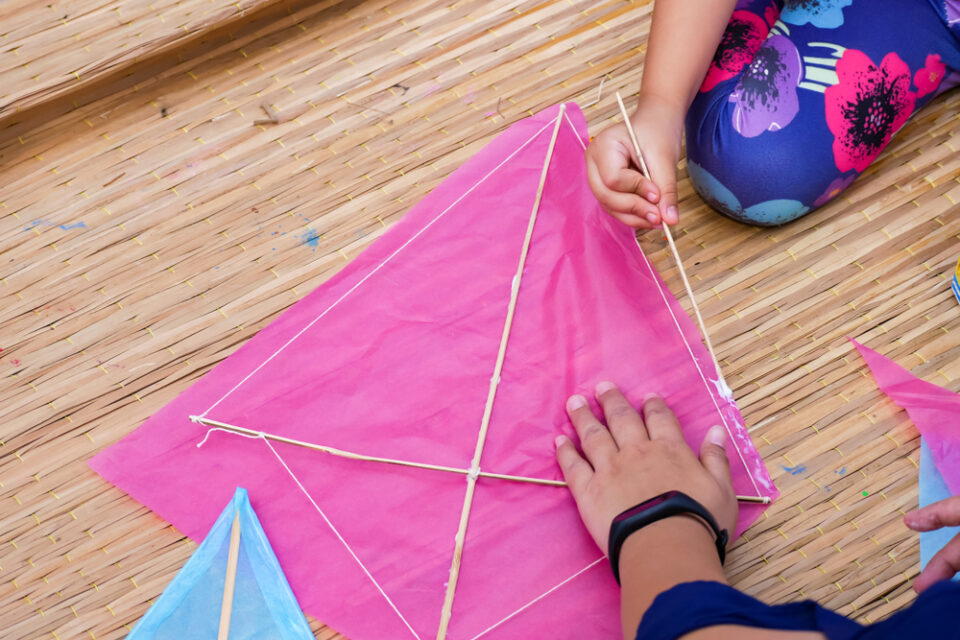
- Lay the 24-inch (60 cm) dowel on your work surface. Place the smaller dowel across it about 6 inches (15 cm) down from the top (they should look like a lowercase “t”). Use a string to wrap them together at the intersection point and secure the string with some tape.
- Stretch the string from the top of your kite to the right edge to make a taught diagonal line. Repeat the process on all four sides until the string is around the kite. This will be your frame.
- Place the sheet of paper on a flat surface and put the kite frame on top. Use a pair of scissors to cut a diamond shape from your paper, making sure to cut about 1 inch larger than the frame.
- Fold the edges of the paper over the string frame and secure them with glue (or tape). Poke small holes into the paper at the top and bottom points of the kite.
- Cut a piece of string about 24 inches (60 cm) long. Loop and tie one end of the flying line into the kite’s top hole (ensure it also loops the frame) and the other end into the bottom hole and frame to make the bridle.
- Tie the flying string (this should be a large bundle, at least 30 feet or 9 meters) around the intersection. This will allow the kite to gain flight and stay afloat in the air. Also, ensure all the knots are tight and properly secured so the kite doesn’t fall back on the ground.
And your kite is ready to fly. Grab your water bottle, kite, and flying line––it’s time to fly that beautiful kite (but don’t forget to read our tips)!
7 Types of Kites
This kite craft for kids will help your children make a diamond kite, one of the most familiar kite styles. However, diamonds are just one of many kite designs! If you were to attend a kite festival (like Uttarayan, the International Kite Festival of India), you’d see a wide range of kites, including the following:
- Delta kites: These are triangle-shaped, making them easy to launch and maneuver in the sky. These kites can survive turbulent weather conditions.
- Parafoil kites: These kites are the inspiration for paragliders and parachutes. They have a frameless design (which makes them more durable during a crash) and use an upper and lower surface that fills with air to stay aloft.
- Cellular kites: These 3D kites are more elaborate in their design and require more flying skills. Although there are many kinds of cellular kites, one of the most common is the box kite.
- Sled kites: While a diamond kite uses a bridle to hold its shape and keep the paper taught, a sled kite uses two spars on either side. This results in a kite that looks like a piece of paper being bent into an upside-down U and is pretty easy for beginners, especially kids, to fly.
- Rokkakus kites: These Japanese kites feature a hexagon shape, which makes them a great canvas for elaborate artwork.
- Stunt kites: These triangular kites look like deltas at first glance, but they have one key difference: they use two parallel flying lines. This gives the flier greater control and the ability to do lots of cool tricks in the air.
- Traction kites: These kites look similar to parafoil kites, thanks to their large arc shape. However, traction kites are designed to create a lot of drag, making them useful in kite surfing or kite skating.
Flying Tips for Kids
Once your kite is ready, your children may want to take it outside on a breezy day for a test run. That’s great! Just make sure to use these tips and tricks for how to fly a kite:
- Make sure the weather is right. A good day for kite-flying has clear skies and a bit of wind. If there are dark clouds or it looks like rain, wait for another time.
- Find an open area with room to run. You’ll need space to chase the breeze and let your kite roam. Keep far away from roads and overhead power lines, which can be dangerous.
- Let out several feet of the flying line. This gives your kite plenty of space to launch before it meets any resistance and makes it more likely to lift into the air.
- Start by standing with your back to the wind and raise the kite over your head. Once the kite catches the wind and begins to rise, slowly release more flying lines.
Keep an eye on your flying line. Pull some of it in to prevent a crash if it starts to go slack. If the line gets too taught and the kite begins moving erratically, let out some line to give the kite room to float on the breeze.

Let Your Kids’ Curiosity Soar to New Heights
Kite flying is one of our favorite spring activities to do with kids. And once your family makes a kite (or two) of their own, we suspect you’ll love it as well! Your kids may want to learn even more about these flying gadgets—and we have a few fun facts that you can wow them with.
Did you know:
- The kite is named after a bird. Kites are birds of prey (such as hawks or vultures) that are buoyant in flight, which means they tend to float in the air. The graceful way they float on the breeze likely inspired kite makers to name the toy after them.
- Kite fishing is a thing. Kite fishers tie hooks to the flying line, passing strong strings through these hooks. They add bait to the string’s end, suspend it in the water, and launch the kite. As the kite flies, it makes the bait bob along in the water—and when a fish bites, the kite’s jerky movements signal to the fisherman that it’s time to reel it in.
- In the 1700s, Japan banned kite flying throughout the country because people preferred flying kites overworking!
Like a Diamond (Kite) in the Sky
These instructions should make it a breeze to get outside with your family this spring and try flying a kite—or, if you want to explore the other things wind can do, try making one of these paper pinwheels. No matter how you spend your time, a spring afternoon outdoors with the kids has the chance to be a magical experience. And don’t forget to check out our Early Explorers subscription box, which allows kids to browse the world’s wonders through exciting games, fun activities, and interesting stories.